I am still buzzing from the experience of working with my online tutor just a couple of days ago.
Since then I have gone through the recording of the call and created all of my flash cards. I created 116 cards in total from just an hour of instruction.
As Anki will create as many as three separate cards per entry, that amounts to just under 40 separate words and phrases.
That is huge value from such a small investment.
Here’s my process for creating the flashcards.
Step 1 – Review My Notes – The first thing I did was go through the recording again and make proper notes in Evernote. During the actual lesson, I scribbled some notes down on paper but they weren’t really very good. In time this step will become irrelevant as I will take better notes in real time
Step 2 – Break Down The First Sentence To Identify Micro-Lessons – The purpose of this step is to identify the different things that can be learnt from the sentence. Each “micro-lesson” will have its own flashcard(s).
For example, one of the sentences my tutor gave me was this:
Mi abuelo tenía el pelo blanco.
From this I identified the following micro-lessons:
- Mi = my
- tener = the verb to have
- tenía = the past tense of the verb tener
- A noun is modified by an adjective which is placed after the noun (pelo blanco)
- The modifying adjective ending changes according to the gender of the noun (blanco and not blanca)
I already knew the words abuelo, pelo and blanco because we were working through a word list I had already memorised. These three words already had cards in my 625 word vocabulary deck.
So all I had to do was create cards for each of the micro lessons.
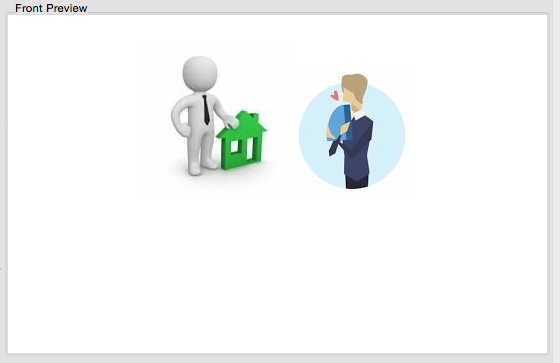
Here is the card for learning that mi=my:
My rationale for picture choice is the guy on the left is in my opinion, claiming some sort of ownership of the green house. The other image just reinforces the concept of possession/ownership.
On the back of the card is just the word “Mi”.
Step 3 – Create a Flashcard For The Entire Sentence – With each of the micro lessons captured, all that is left to do is make a flashcard with the entire sentence.
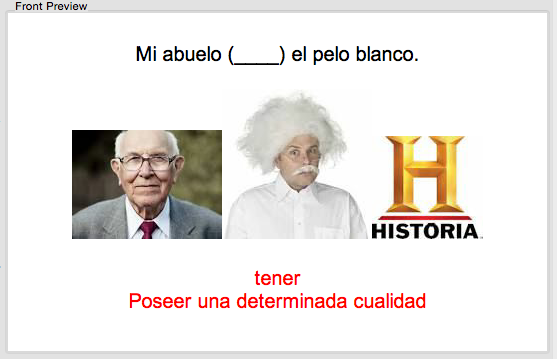
For the example I felt the most important lesson for the sentence was the use of tenía as the past tense of “to have”. So I created a card that looked like this:
My logic in the choice of pictures is someone who is old enough to be my grandfather (abuelo). The next one was someone with white hair. The Historia reference is to remind me the sentence refers to the past.
When selected with this card, my task is to work out what conjugation of tener is most appropriate for the blanked out word.
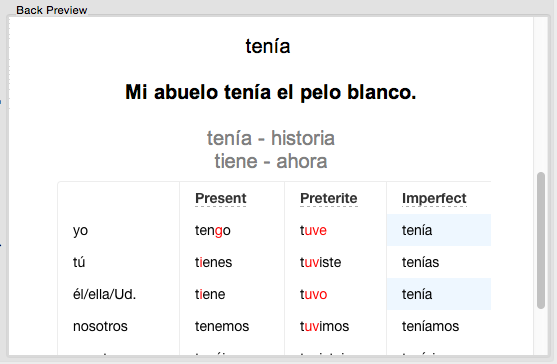
And on the back it looked like this:
It has the answer (tenía) and an extract of the conjugation table for the verb tener so I can see how it fits in with the other forms.
Step 4 – Repeat Steps 1, 2 and 3 For The Remaining Sentences – And then all I had to do was rinse and repeat for the rest of the sentences.
It is a bit of a time consuming task to create the cards, but that is a good thing.
Here’s why.
By really thinking about the sentences to identify what you can learn from them you process them at a deeper level. This means there is true learning going on AS you create the cards.
This is then reinforced by the even deeper learning that will occur when you work with the cards and review them frequently.
It probably took me about three hours to create the cards from one hour of one on one tuition.
But I think it was more than worth it for the richness of the learning I experienced.
The Main Lessons I Learned
- The processing of my notes and the creation of the cards should be done within 24 hours of the lesson
- I should take notes directly into Evernote during the next lesson
- Having a systematic approach to processing the cards saves time
- Cards should also be made of the little asides I have with the tutor about the nuances of the language
- As I process the notes I will capture questions to ask the tutor at the next lesson.
I think it is already time to book the next lesson…


Leave A Response